CohoesProject: Difference between revisions
No edit summary |
|||
| (27 intermediate revisions by the same user not shown) | |||
| Line 1: | Line 1: | ||
Since I've retired, the most frequently asked question is "''What do you do to keep busy?''" I have lots of projects, but the most demanding and rewarding is working on | Since I've retired, the most frequently asked question is "''What do you do to keep busy?''" I have lots of projects, but the most demanding and rewarding is working on our son Eric's house. In December 2010, Eric bought an 1895 Victorian house in Cohoes. Eric looked for several months at a variety of houses in the Waterford and Cohoes area. Eric and his realtor Chris looked at almost 20 houses. Eric asked me to look at a few of them. To be honest, most of the houses were disasters and money pits. Even once they were fixed up, they had little to offer. When Eric showed me the Victorian, I could see it had good bones. For sure, parts of it looked like it would collapse, and the property was a mess. | ||
Fixing up an old house requires vision, money, time and sweat equity. Fortunately, as a family, we have all four. | Fixing up an old house requires vision, money, time and sweat equity. Fortunately, as a family, we have all four. | ||
| Line 6: | Line 6: | ||
=Before and After= | =Before and After= | ||
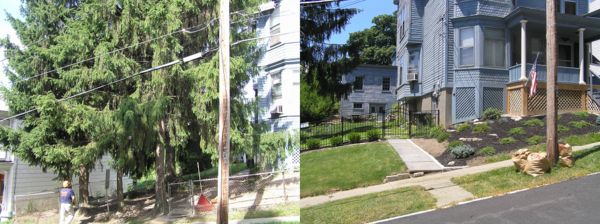
<div class="floatleft">[[Image:Trees.jpg|thumb|600px|'''The Trees.''' Six large spruce trees dominated the side yard. Our first outdoor project was to remove four of the large spruces. This opened up the front and side yard for further improvement. It also opened up views from the second floor and kept the trees out of the electrical lines. | |||
]]</div> | |||
<br> | |||
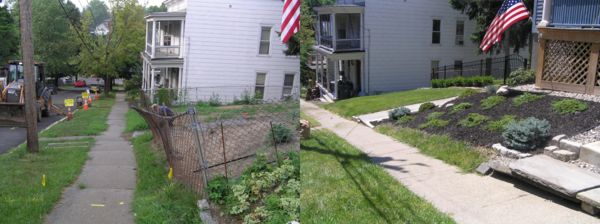
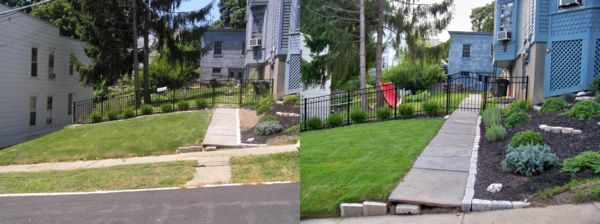
<div class="floatleft">[[Image:FrontFence.jpg|thumb|600px|'''The Front Fence'''. A decrepit chain link fence ran along the front of the property. We removed it and installed an aluminum fence. We set the fence back about 20 feet from the sidewalk. This allowed us to have a small front yard and to landscape the hill below the front porch.]]</div> | |||
= | |||
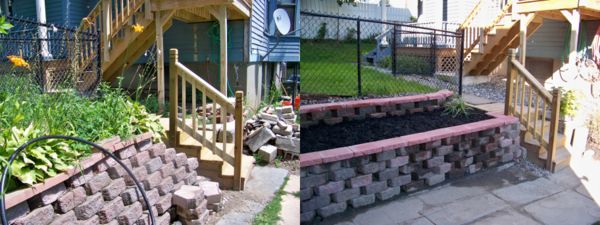
<div class="floatleft">[[Image: | <div class="floatleft">[[Image:BackWall.jpg|thumb|600px|'''The Back Wall'''. The back yard is on two levels. An existing wall created a terrace that separated the two levels. The wall was falling backwards and needed repair. This was a real sweat equity project. Not much monetary investment required. We tore down the old wall, leveled it and reused the concrete blocks. The soil at Eric's house is clay, so we built a french drain behind the wall to handle water coming from the top level of the yard. We back-filled behind the wall with pea gravel, topped with landscape fabric and mulch.]]</div> | ||
==The Front | |||
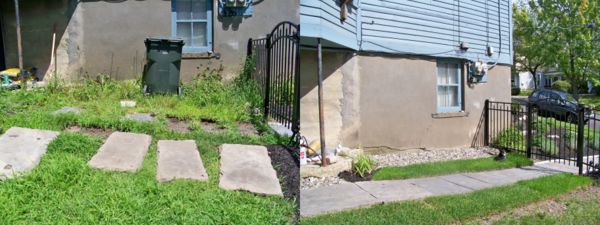
<div class="floatleft">[[Image: | <div class="floatleft">[[Image:SlateSidewalk.jpg|thumb|600px|'''Slate Sidewalk'''. Another sweat equity job. Eric's house has slate sidewalks leading to the back garage. Over the years, tree roots, erosion and the underlying clay soil had wreaked havoc with the side walk. The slates were thick and heavy, but in good shape. We used two large crow bars (spud bars) to move the slates. We removed underlying roots and leveled the slates with stone dust.]]</div> | ||
< | |||
<div class="floatleft">[[Image:SlateSidewalk2.jpg|thumb|600px|'''Slate Sidewalk.''']]</div> | |||
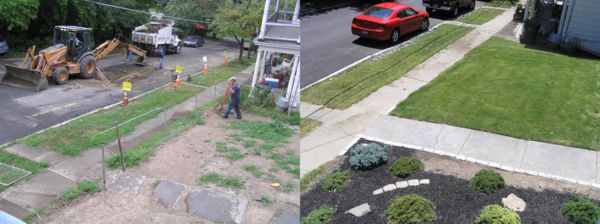
<div class="floatleft">[[Image:StoneDripEdge.jpg|thumb|600px|'''Stone Drip Edge.''' Around the base of the house in the front and side, we used #2 round stone as a drip edge. Beneath the stone we laid landscaping fabric. This provides a weed-free border as well as providing good drainage around the house. One of our first purchases was a [http://www.harborfreight.com/1720-lb-capacity-super-duty-48-inch-x-96-inch-utility-trailer-with-12-inch-five-lug-wheels-and-tires-94564.html trailer from Harbor Freight]. We've used it to haul stone and grass sod.]]</div> | |||
<div class="floatleft">[[Image:Rental.jpg|thumb|600px|'''Rental Kitchen.''' The kitchen in the upstairs rental was in rough shape. We refinished the pine cabinets, installed a laminate floor and replaced the appliances. The final result is a clean, reliable and functional kitchen.]]</div> | |||
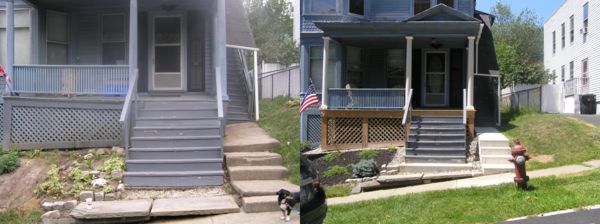
<div class="floatleft">[[Image:FrontPorch.jpg|thumb|600px|'''FrontPorch.''' The front porch was a disaster. No footings, and the concrete steps to the upstairs rental were sloped downhill, pushing against the porch. Very dangerous. This was not a DIY project. We hired [http://www.danieljhinmanremodelingandconstruction.com/default.html Dan Hinman], a rleiable contractor we have used at our own house and he did a great job.]]</div> | |||
<div class="floatleft">[[Image:FrontEntrance.jpg|thumb|600px|'''The Front Rental Entrance.''' The front stairs to the rental unit were open and ugly. [http://www.danieljhinmanremodelingandconstruction.com/default.html Our reliable contractor, Dan Hinamn] replaced them with an enclosed entrance that fits the character of the house.]]</div> | |||
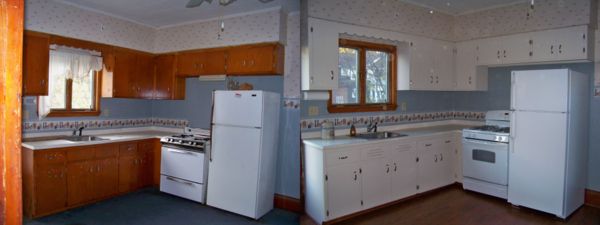
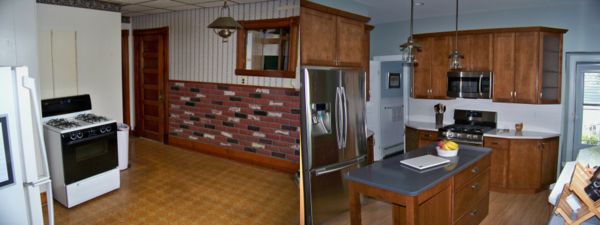
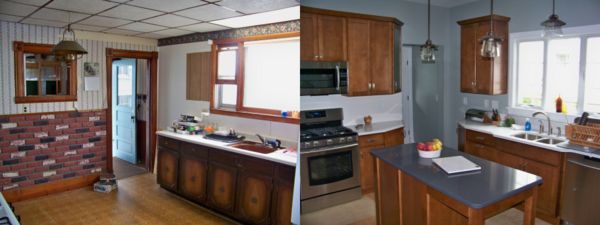
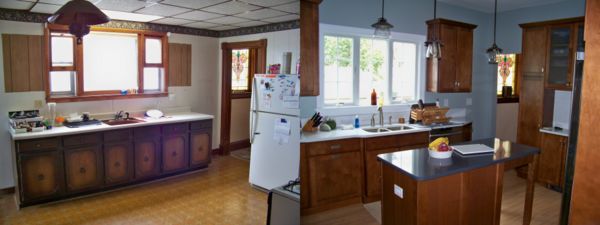
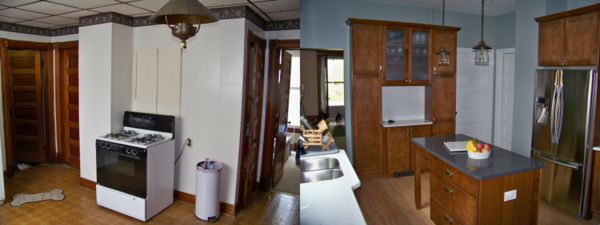
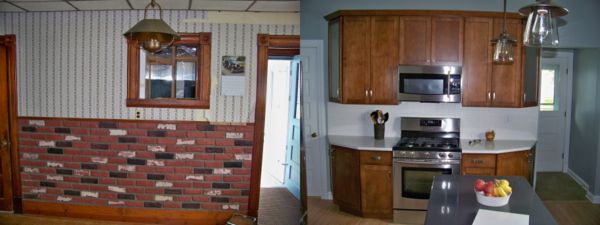
<div class="floatleft">[[Image:Kitchen1.jpg|thumb|600px|'''Kitchen.''' This was the largest project so far, both in time and money. Once again we relied on [http://www.danieljhinmanremodelingandconstruction.com/default.html Dan Hinman] to produce a great result. Terri and Jacque LeGere, [http://www.curtislumber.com/ Curtis Lumber], designed the kitchen. The side-by-side before and after pictures illustrate the dramatic transformation.]]</div> | |||
<div class="floatleft">[[Image:Kitchen2.jpg|thumb|600px|'''Kitchen.''']]</div> | |||
<div class="floatleft">[[Image:Kitchen3.jpg|thumb|600px|'''Kitchen.''']]</div> | |||
<div class="floatleft">[[Image:Kitchen4.jpg|thumb|600px|'''Kitchen.''']]</div> | |||
<div class="floatleft">[[Image:Kitchen5.jpg|thumb|600px|'''Kitchen.''']]</div> | |||
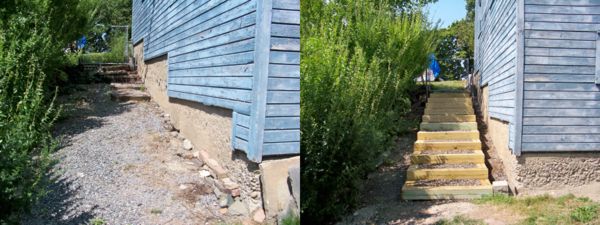
<div class="floatleft">[[Image:BackSteps.jpg|thumb|600px|'''The Back Steps.''' Eric's garage entrance is from another street. There are inside steps from the garage to the back yard. But there is also a gate to an outside slope. For this sweat equity, DIY project, we built 12 steps from 6x6 treated lumber to navigate the slope. The step treads are filled with pea gravel ( 3 yards worth). This will be a useful entrance to the back yard for most of the year (except winter). We also installed drainage to handle water from the garage roof. Besides their utility, the steps look great.]]</div> | |||
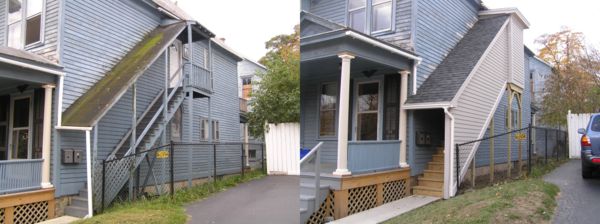
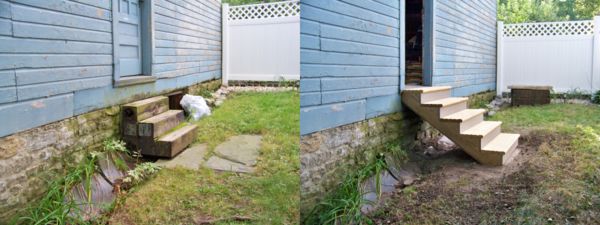
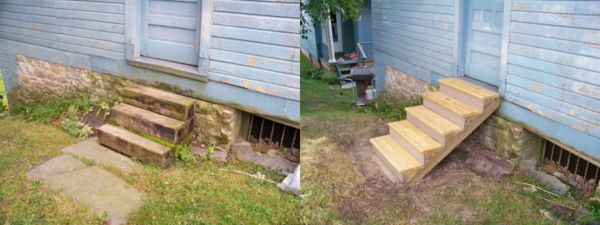
<div class="floatleft">[[Image:CarriageHouseSteps1.jpg|thumb|600px|'''The Carriage House Steps.''' The existing steps were made of railroad ties. They were not properly spaced and our frequent trips to the carriage house reminded me that some day, someone would have a problem with them. I found [http://www.lowes.com/pd_4654-432-5STEPT140N_0__?productId=3185195&Ntt=stringers&pl=1¤tURL=%3FNtt%3Dstringers&facetInfo= pre-cut stringers at Lowes] as well as [http://www.lowes.com/pd_2491-432-2123BNT15N_0__?productId=3184401&Ntt=treated+steps&pl=1¤tURL=%3FNtt%3Dtreated%2Bsteps&facetInfo= treated deck stair treads]. I researched stinger connectors and found [http://www.strongtie.com/products/connectors/LSC.asp a great solution] at [http://www.homedepot.com/h_d1/N-5yc1v/R-202092483/h_d2/ProductDisplay?catalogId=10053&langId=-1&keyword=Stair-Stringer+Connector&storeId=10051#.UFYqwuNEycY Home Depot]. The hardest part was leveling the 4" thick slate base for the steps.]]</div> | |||
<div class="floatleft">[[Image:CarriageHouseSteps2.jpg|thumb|600px|'''The Carriage House Steps.''']]</div> | |||
Latest revision as of 15:21, 16 September 2012
Since I've retired, the most frequently asked question is "What do you do to keep busy?" I have lots of projects, but the most demanding and rewarding is working on our son Eric's house. In December 2010, Eric bought an 1895 Victorian house in Cohoes. Eric looked for several months at a variety of houses in the Waterford and Cohoes area. Eric and his realtor Chris looked at almost 20 houses. Eric asked me to look at a few of them. To be honest, most of the houses were disasters and money pits. Even once they were fixed up, they had little to offer. When Eric showed me the Victorian, I could see it had good bones. For sure, parts of it looked like it would collapse, and the property was a mess.
Fixing up an old house requires vision, money, time and sweat equity. Fortunately, as a family, we have all four.
Here a a few of our completed and on-going projects.
Before and After
